Live View
Framing and focusing cameras in real time
Live View shows a real-time preview of what a camera is seeing. Use it to compose a shot, check and adjust focus, or confirm that each camera is pointing where it should be before you trigger it.
The main place to work with Live View is the Live View window, which shows one camera at a time. Live View can also be shown in the Preview window and in the Dashboard tiles (see Live View in the Preview and Dashboard).
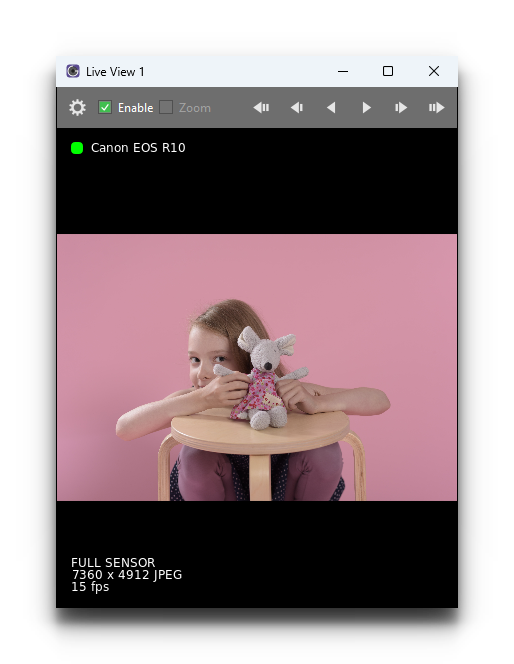
Live View Windows
CaptureGRID has four Live View windows, named Live View 1 to Live View 4. Open them from the menu. Like any other pane they can be docked, floated or tabbed, and kept as part of a saved workspace (see Application Interface).
Having more than one open lets you monitor several cameras side by side. Each window has its own camera and its own options, so one window can show a camera at full frame while another is zoomed in to check critical focus.
Choosing the Camera
Click the Options button (the cog at the left of the toolbar) to choose which camera the window shows, under Show Live View From:
With Active Camera ticked (the default), the window follows the camera selected in the Camera Controls window (see Active Camera).
With it unticked, pick a camera from the list and the window stays on that camera, whichever camera is active. The list includes every camera that has been connected before, so a window can stay set to a camera while it is disconnected.
The controls in a Live View window, and the mouse actions described below, only ever affect the camera that window is showing.
Toolbar
Control |
What it does |
|---|---|
Options (cog) |
Opens the window’s options (see Window Options) |
Enable |
Turns Live View on or off on the camera |
Zoom |
Switches the camera to a zoomed-in Live View (see Zooming). Unavailable when Live View is off, or the camera doesn’t support zoom |
Focus buttons (six arrows) |
Move the focus further away (the three buttons on the left) or nearer (the three on the right), in large, medium or small steps. The outermost buttons make the largest steps |
The Enable and Zoom checkboxes show the camera’s current state, so they also update if Live View is turned on or off some other way, such as from a script or the External API.
Focusing
Moving the AF Area
The Live View shows the camera’s AF (autofocus) area as an outlined box. Hover over it and the outline turns red and is labelled AF AREA. Drag the box to move the AF area to a different part of the frame. A movement of less than a few pixels is treated as a click rather than a drag, so the box doesn’t move by accident.
When the view is zoomed in, dragging moves the zoomed region instead (see Zooming).
Whether the camera then focuses at the AF area depends on its own autofocus settings. It needs an AF mode where you choose the focus point, usually a single-point Live View AF mode. In modes such as face tracking or automatic area selection, the camera may pick its own focus point instead. The right setting varies between cameras.
Double-Click to Focus
Double-click anywhere in the Live View window to move the AF area to that point and focus there. This is quicker than dragging the AF area into place and then pressing Auto Focus.
When the view is zoomed in, it only shows the zoomed region, so a double-click recentres the zoomed region on the point you clicked and then focuses.
The AF area is always kept within the camera’s sensor, so a double-click near the edge of the frame moves it as far as it can go. If the camera cannot move its AF area, a double-click still focuses at the camera’s current AF point.
Auto Focus
Besides double-clicking, you can trigger autofocus with:
The Auto Focus button in the Camera Controls window
The
F6keyboard shortcut (see Keyboard Shortcuts)Auto Focus in the right-click menu of a camera in the Cameras window or a Dashboard tile
These act on the active cameras, which may be several cameras at once, whereas a double-click in a Live View window focuses only the camera that window is showing.
While the camera is focusing after a double-click or a turn of the mouse wheel, FOCUS is shown briefly at the top-right of the view.
Zooming
Tick Zoom to switch the camera to a magnified Live View of part of the frame, for checking critical focus. The camera decides the resolution of the Live View image, and it is much lower than a photo. When zoomed in, the camera sends a crop of the sensor at finer detail, which makes zoom the best way to focus precisely by eye. The statistics overlay (see Overlays) reads ZOOM REGION while zoomed and FULL SENSOR otherwise.
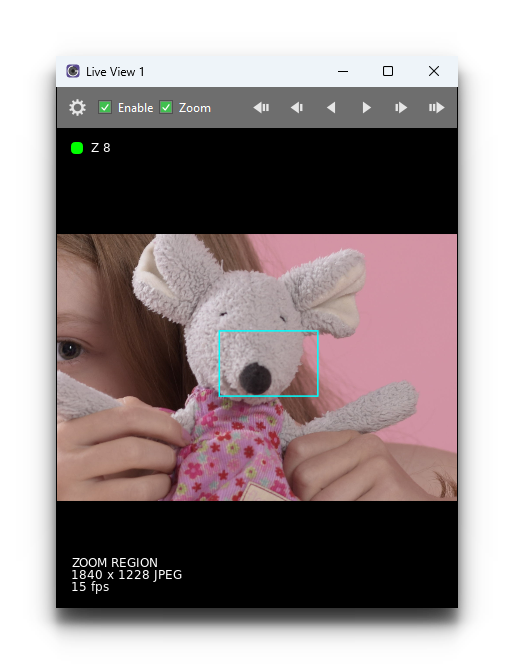
To look at a different part of the frame while zoomed, either:
Drag the outlined box. While you drag, the view shows the whole sensor so you can see where the zoomed region will go.
Double-click a point in the view to recentre the zoomed region on it.
The zoom level varies depending on the camera model, and not every camera supports zoom — see Camera Support.
Overlays
The Live View window can draw these on top of the live image:
- Live View indicator (top-left)
The camera’s name, with a status light that pulses green while Live View frames are arriving, yellow while Live View is on but no frame has arrived yet, and red while the camera is recording video. It is grey when Live View is off. Toggle it with Show Live View indicator.
- Statistics (bottom-left)
Whether the view is the full sensor or a zoomed region, the size of the Live View image, and the frame rate it is arriving at. Toggle it with Show Live View statistics.
- AF area
The outlined box described in Moving the AF Area. It is always shown when the camera reports an AF area.
- Grid
A grid of lines over the live image, to help with composition and lining up cameras. See Window Options.
- Image overlay
A semi-transparent image of your choice drawn over the Live View, for example a previous photo to line up a repeat shot. It is not drawn while zoomed in. See Window Options.
While the camera is recording video, the elapsed recording time is shown at the top-right.
Window Options
Click the Options button (the cog) to open the window’s options. Each of the four Live View windows keeps its own settings.
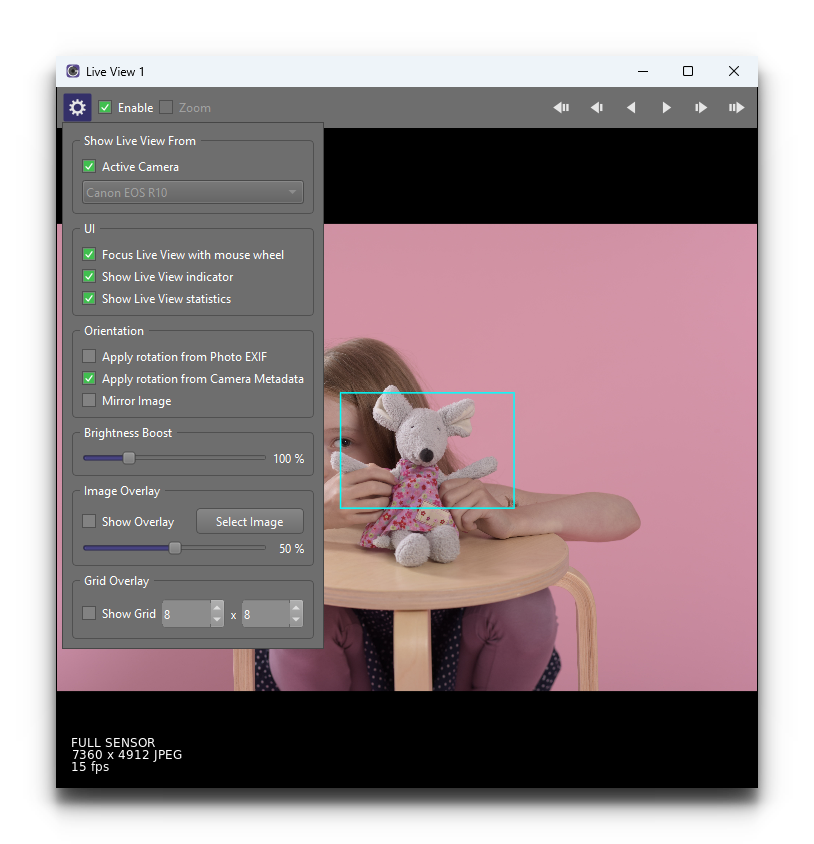
Show Live View From
Active Camera (on by default) — follow the active camera. Untick it to pick a camera from the list instead. See Choosing the Camera.
UI
Focus Live View with mouse wheel (on by default) — focus by turning the mouse wheel over the view. See Focus Buttons and Mouse Wheel.
Show Live View indicator (on by default) — show the camera name and status light.
Show Live View statistics — show the zoom state, image size and frame rate.
Orientation
Apply rotation from Photo EXIF — rotate the view to match the orientation the camera records in its photos.
Apply rotation from Camera Metadata (on by default) — rotate the view by the orientation set with Set Orientation in the camera’s right-click menu.
Mirror Image — flip the view horizontally.
Brightness Boost
Brighten or darken the view, from 10% to 400% (100% by default). This only changes how the image is displayed, not the camera’s exposure.
Image Overlay
Tick Show Overlay and click Select Image to draw an image over the view, for example a previous photo to line up a repeat shot. The slider sets how strongly the image shows, from 0 (invisible) to 100 (fully opaque), and starts at 50. The image isn’t drawn while zoomed in.
Grid Overlay
Tick Show Grid to draw a grid over the view, and set the number of rows and columns (8 x 8 by default). The grid uses the same colour as the grid in the Preview window.
Live View in the Preview and Dashboard
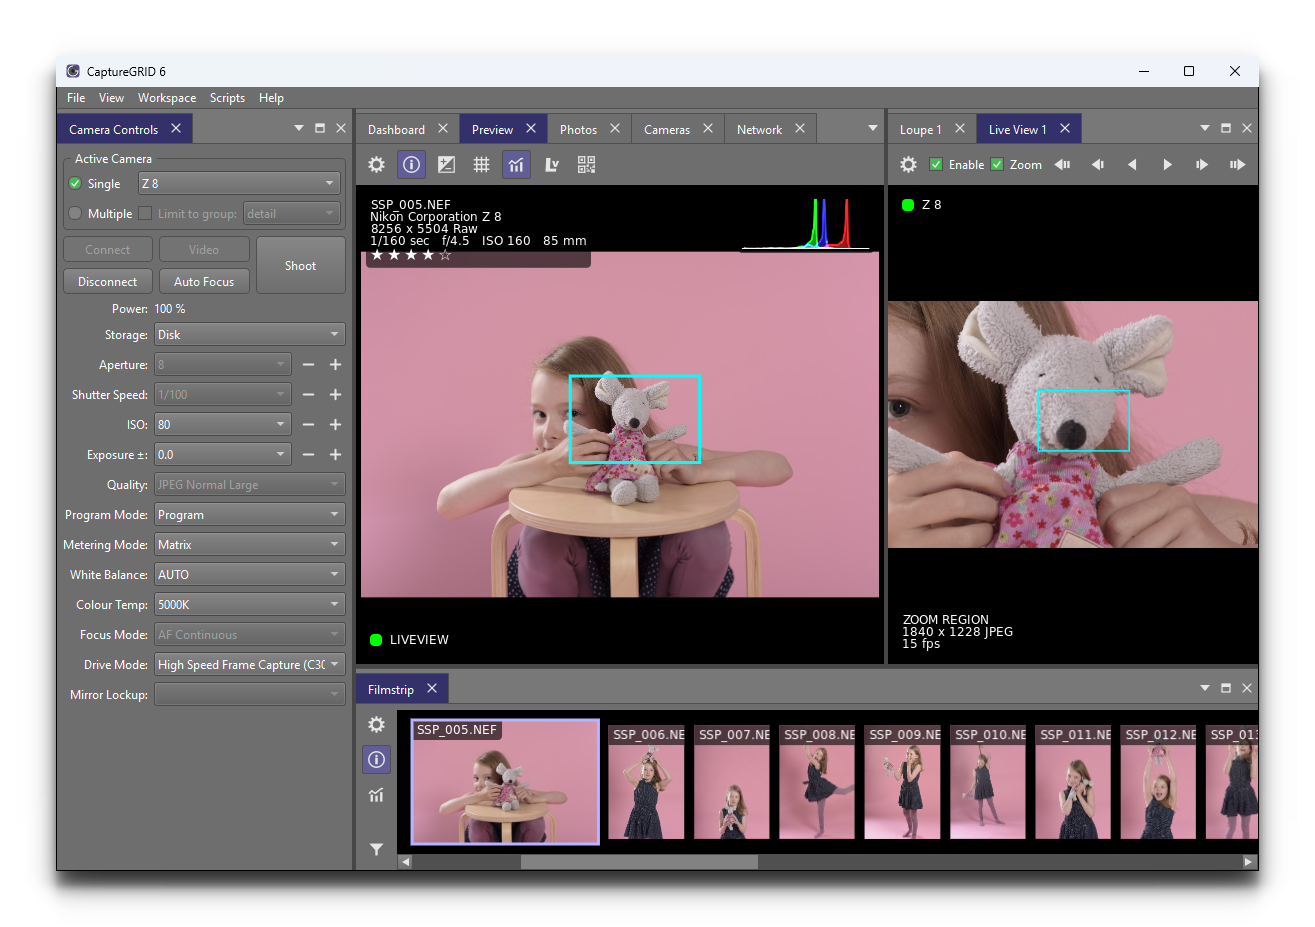
The Preview window and the Dashboard can show Live View as well as photos. Each has a Live View Overlay Options button (marked Lv) on its toolbar with these settings:
Show Live View Overlay (on by default) — show Live View when it is available.
Transparency (100 by default) — how strongly Live View covers the photo underneath. At 100 it is fully opaque.
Brightness Boost (100% by default) — brighten or darken Live View, from 10% to 400%, as in the Live View window.
Photo Review Time (4 seconds by default) — how long a newly taken photo is shown before Live View takes over again. While a photo is being reviewed, the indicator reads LIVEVIEW: REVIEW with a countdown.
Showing Live View there takes two steps: Show Live View Overlay must be ticked, and Live View must be turned on for the camera — from a Live View window, for example.
Preview
The Preview shows Live View from the camera that took the photo being displayed, drawn over the photo, with LIVEVIEW at the bottom-left.
Not zoomed: the AF area is outlined as in the Live View window. Drag it to move the AF area, or double-click a point to move the AF area there and focus.
Zoomed: the Preview always shows the whole sensor, so the zoomed Live View is drawn inside an outlined box at the position of the zoomed region, labelled LIVE VIEW when you hover over it. Drag the box, or double-click elsewhere in the photo, to move the zoomed region. A double-click inside the box focuses without moving it.
When Live View is showing, Scan Image for Barcode scans the Live View image (see Barcode Scanning).
Dashboard
Each Dashboard tile shows Live View from its own camera when Live View is on for that camera. After the camera takes a photo, the tile shows the photo for the Photo Review Time, then returns to Live View. The tiles don’t respond to dragging or double-clicking; to focus a camera from the Dashboard, right-click its tile and choose Auto Focus. See Dashboard.
Camera Support
Which Live View features are available depends on the camera:
Camera |
Zoom |
Move AF area |
Focus buttons |
Auto Focus |
|---|---|---|---|---|
Canon |
Yes |
Yes |
Yes * |
Yes * |
Fujifilm |
Yes |
Yes |
Yes * |
Yes * |
Nikon |
Most models |
Yes |
Most models * |
Yes |
Sony |
Some models |
Zoomed only |
Yes * |
Yes * |
* With conditions — see Camera-Specific Notes.
Live View itself is available on every supported camera except the Nikon D3000 and D3100, the Sony a6000 and the Ricoh Theta S. For the full list of supported cameras, see Supported Cameras.
Camera-Specific Notes
Some cameras need particular settings for Live View features to work, or behave differently from the rest.
All Cameras
Some cameras limit their exposure settings while Live View is on. For example, the Nikon D7000 can’t use shutter speeds slower than 1/30 s in Live View. Turn Live View on before setting the aperture and shutter speed, so that you see the values the camera will actually use.
The Live View image can be framed slightly differently from the photo the camera takes. This comes from the camera and lens.
Whether Live View keeps running while the camera records video depends on the model.
Canon
Canon cameras use the same position for the AF area and the zoomed region, so moving the AF area also sets which part of the frame is magnified when you turn on Zoom.
The focus buttons need the lens’s AF/MF switch set to AF.
Auto Focus doesn’t work when the camera’s Focus Mode is MF, for example because the lens’s AF/MF switch is set to MF.
Fujifilm
Fujifilm cameras have a Control Mode setting in the Camera Controls window, set to Camera or App. It starts as Camera. The focus buttons and Auto Focus only work in App mode.
The focus buttons only work when the camera’s Focus Mode is MF. In any other focus mode they have no effect, even though they are not greyed out. The steps are a share of the lens’s focus range, and focus stops at the ends of the range.
Auto Focus doesn’t work when the Focus Mode is MF. Live View pauses briefly while the camera focuses.
While Live View is on, the camera ignores its own buttons, so you can’t shoot or change settings on the camera body. The settings can’t be changed from the app either. Turn Live View off to change them.
Turning zoom on or off briefly restarts Live View.
The AF area moves in whole focus points, so very small drags are ignored. The size of the box drawn for the AF area is approximate.
Taking a photo stops Live View on the camera. It is turned back on automatically afterwards (see Automatic Behaviour).
Nikon
The focus buttons need an autofocus lens, with the lens and camera set to AF rather than MF.
The D3000 and D3100 don’t support Live View. The D3200, D3300, D3400 and D3500 support Live View, but not zoom or the focus buttons.
On the D800 and D800E, set the camera’s Live View selector to Live View photography, not movie Live View. Movie Live View shows the image at a different aspect ratio, and blocks RAW and some shutter speeds.
When not zoomed, dragging moves the camera’s AF point. When zoomed, it moves the zoomed region.
While Live View is on, the camera’s Live View AF-area mode is switched to normal-area AF, so that the AF area can be moved. Your own setting is put back when Live View is turned off.
On older models, photos are stored in the camera’s internal memory while Live View is on, and the Storage setting can’t be changed until Live View is turned off.
Sony
The camera’s USB connection must be set to PC Remote.
The Sony a6000 doesn’t support Live View.
The focus buttons only work when the camera’s focus mode is MF. If they have no effect, set the camera to manual focus.
Not all Sony models support Live View zoom. On those that don’t, the Zoom checkbox is unavailable.
The AF area can’t be moved from the app. Dragging only works while zoomed, where it moves the zoomed region. When not zoomed, a double-click focuses without moving anything.
Auto Focus doesn’t work when the camera’s Focus Mode is MF. On models with a focus mode dial on the body, such as the a9 III, the dial decides the focus mode and the app’s Focus Mode setting has no effect. If Auto Focus does nothing, check the dial isn’t set to MF.
Turn Live View zoom off before using a power zoom lens. While Live View zoom is on, power zoom doesn’t move.
Automatic Behaviour
CaptureGRID looks after Live View in the background:
Many cameras leave Live View when they take a photo. If you turned Live View on, CaptureGRID turns it back on automatically once the shot has finished, and restores the zoom if it was zoomed in.
Live View frames are paused while a photo is being taken, so the capture isn’t slowed down.
Live View is turned off when a camera is disconnected.
The Cameras window has a Live View column showing whether Live View is on for each camera (see Cameras Window).
Tip
Live View places noticeable load on the camera and the USB connection. If you are running a large rig, consider only turning Live View on for the cameras you are actively framing, and turning it off on the others.