Camera Control
How to control your cameras
The app exposes several ways to monitor and control the cameras, and allows actions to be done across multiple cameras at the same time.
The primary way of control is using the Camera Controls window, as shown below. This window serves 3 purposes:
Which cameras are active; either one specific camera, all cameras, or a group of cameras
Actions to take on the active cameras
View current status of the active cameras
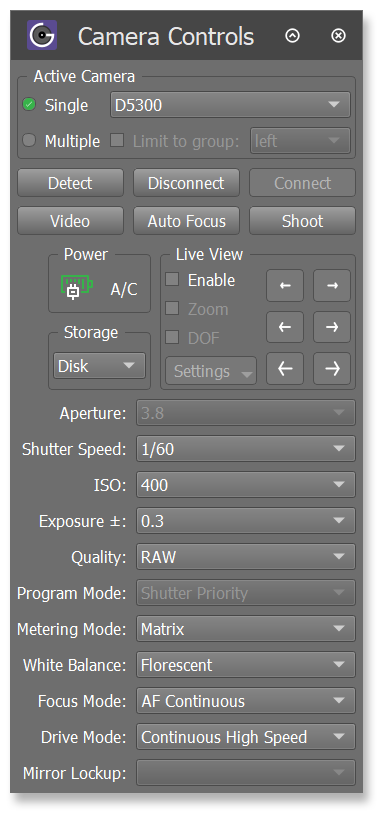
Active Camera
At the top of this window is the Active Camera section, which a dropdown list of all the cameras that are currently connected. By changing the selection in this dropdown list, you can switch to controlling/viewing a different camera.
It also contains a checkbox for Single and Multiple. When Single is enabled, then any actions taken will affect only the camera that is currently selected in the dropdown list. When Multiple is selected, then any actions will affect all connected cameras.
The Limit to group checkbox allows a specifc set of cameras to be selected. These camera groups can be created in the camera table UI, by right-clicking the camera as shown below:
Keyboard Shortcuts
The following table shows the keyboard shortcuts you can use:
Key |
Description |
|---|---|
T |
Take a photo |
Z |
Take a photo on all connected cameras |
F |
Auto Focus |
R |
Run the currently loaded script |
A |
Select the aperture camera setting |
S |
Select the shutter speed camera setting |
I |
Select the ISO camera setting |
E |
Select the exposure compensation camera setting |
Q |
Select the photo quality camera setting |
M |
Select the metering mode camera setting |
W |
Select the white balance camera setting |
Up arrow |
Change the value of the currently selected camera setting |
Down arrow |
Change the value of the currently selected camera setting |